Using GitHub Pages with Custom Domain from 1&1 IONOS
Dear diary,
Today I spontaneously decided to move my portfolio to Github Pages. It was previously hosted on a VPS, which was overkill for a one-pager static website that remained dormant for years.
… Okay fine, it wasn’t spontaneous.
It’s a long overdue task I’ve been putting off.
Backstory: I had previously used the VPS to host 3 other domains, and the VPS was shared among 8 friends so it was somewhat justified — but now that my other 2 websites are defunct, there is really no reason why I should keep my static portfolio on VPS

Anyway, setting up GitHub Pages was easy peasy lemon squeezy. I simply followed the instruction on the GitHub Pages official page and my GitHub Page was running in less than 5 minutes.
But an issue came when I wanted to set up Custom Domain with HTTPS. In order to do that, you needed to set up some DNS records through your DNS provider — in my case, 1&1 IONOS.
I’ve done this many times and I imagine the set up should be fairly easy, however, I did run into a few issues on SSL certification… so I’ll run through the steps and how I fixed it below:
Setting up DNS Records on 1&1 IONOS for GitHub Pages
Step 1: Define Custom Domain on GitHub Pages
Enter your custom domain name in your GitHub Pages repository setting.

This will create a CNAME file in the root of your repository, containing a string of the custom domain name you’ve just defined.

For me, I simply entered my apex domain (melissahie.com) since that’s what I’ve always used. What that means is that I’ve always used the site without the www subdomain. If you need the www subdomain, you can still input this in the custom domain field, but you then need to follow the instruction for www, which involves setting up CNAME instead of A record.
Step 2: Login to your Control Panel
Log in to your 1&1 IONOS Control Panel and select the domain you want to use with your GitHub Pages. If the domain was previously used with a separate hosting (like mine) it might say something like “Your own name server NS1, NS2, etc”. This is normal.
Step 3: Reset your DNS records to default settings
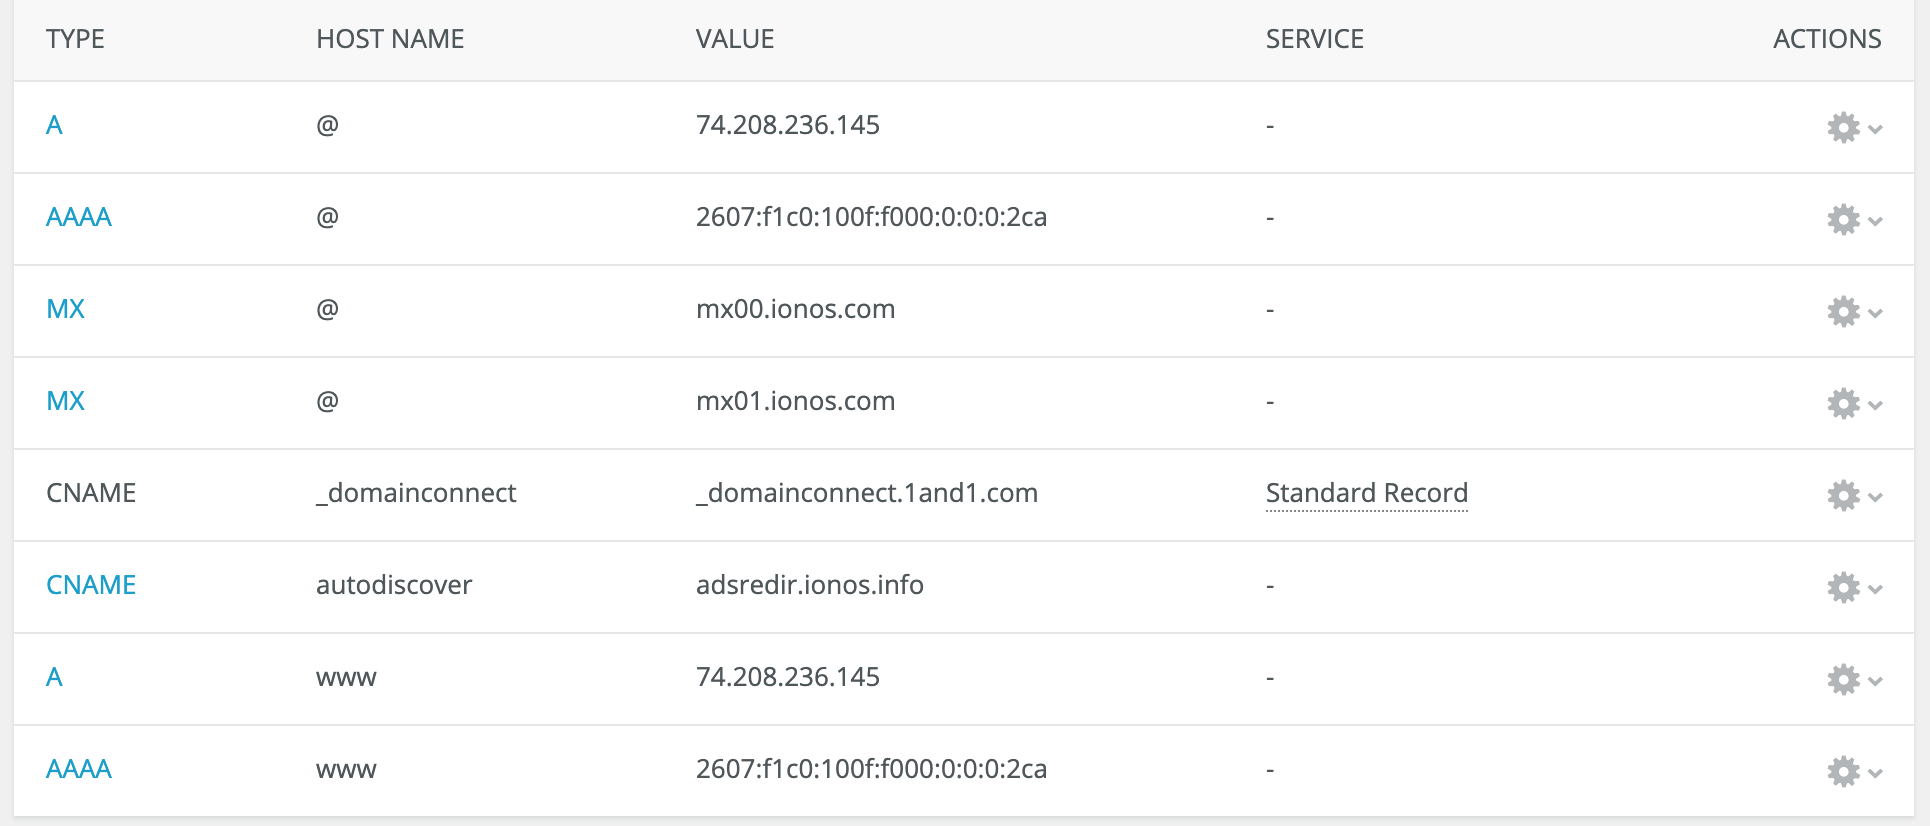
Click through to the domain settings and click on “Adjust Nameserver” or on the “DNS” tab. In 1&1 IONOS, you might encounter a messaging that says DNS records are inactive since you are using a custom nameserver.
If you are already set on using GitHub Pages, simply record these nameservers down somewhere (just in case) and proceed to reset the DNS records to the default settings.
It will look something like this on the DNS Tab:

Step 4: Create DNS Records for GitHub Pages
You can then create the A records as specified on GitHub Pages Custom Domains setup. Delete the existing A record created when you reset the DNS records on Step 3, and create 4 separate A records with hostname “@” one by one for each the four IP Addresses.
It should look like this:

PS: Bear in mind that this only works for apex domain, ie: melissahie.com — NOT www.melissahie.com. Again, if you had been using www subdomain before and want to keep it that way, then follow the instruction for www, which involves setting up CNAME instead.
Step 5: Trigger the SSL Certification
Go back to your GitHub pages repository settings, and delete your custom domain, hit save, then enter the custom domain and hit save again. This will trigger the SSL certification so that your site can finally be accessed through https.
Troubleshooting HTTPS / SSL Certificate
After doing all of the steps above, my GitHub pages were correctly being served through the custom domain. I could access my site from the unsecure http:// melissahie.com.
However, accessing https:// melissahie.com gave me a “Your connection is not private” error — a telltale of SSL certification gone wrong. I was also not able to tick the “Enforce HTTPS” option from my GitHub pages repo settings and was presented with this message:

After speaking to GitHub customer services, we determined it was because I had an AAAA record set on my apex domain. It turns out when I reset my 1&1 IONOS DNS settings before, an AAAA record was automatically created — which you can actually see in the screenshot above on Step 3. Simply delete this AAAA records (but keep the A records you’ve created in Step 4!).
I went back to my GitHub pages repo again, and voila! I was presented with a new promising message - The certificate is now being issued:

Now all you have to do is wait.
Not even an hour later, I was able to access my site from https and able to tick the “Enforce HTTPS” box from my GitHub repo settings.

I highly recommend enabling this option to ensure your site is always being served securely.
Hope this helps!